
 Plotly Javascript library supports generating various charts. Java Servlet & JSP based web applications can use it to display graphical representations of data.
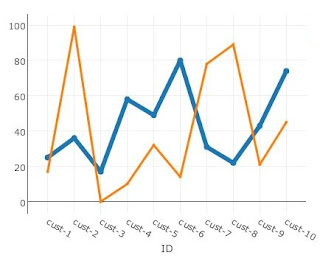
In this tutorial, you will learn to include graphs into a simple Java web application. Image above shows the graph generated at the end of the tutorial. Complete project is already moved to github for your references.
This tutorial consists of two parts.
Part 1
First step is to create a simple web application with index.jsp that can submit a user entered parameter to a Servlet which is redirecting the user back to original index.jsp.Part 2
Here the above servlet is modified to return some data (collection of Customer objects) and index.jsp is modified to draw a chart using those data.Note: If you are familiar with Java web applications, you can jump to Part 2 directly.
Part 1
1. Build a simple web application
 This project contains only one JSP page and a Servlet. JSP is used to display a form & a chart while the Servlet is used to generate raw data for the chart.
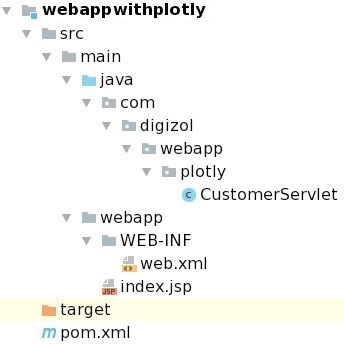
First create the Java web application project structure as shown in image.
An index.jsp and a CustomerServlet with web.xml for a simple web application. It also has a pom.xml for the build.
CustomerServlet
doGet() method prints the size parameter in the request; then forwards the request to index.jsp page.
package com.digizol.webapp.plotly;

import javax.servlet.ServletException;
import javax.servlet.http.*;
import java.io.IOException;

public class CustomerServlet extends HttpServlet {

    @Override
    protected void doGet(HttpServletRequest request, HttpServletResponse response)
            throws ServletException, IOException {

        System.out.println("Parameter [size] value = " + request.getParameter("size"));
        request.getRequestDispatcher("/index.jsp").forward(request, response);
    }
}
web.xml
This is the file that configures Servlet related information. Here URL "/customers" is mapped to CustomerServlet.
<web-app xmlns="http://xmlns.jcp.org/xml/ns/javaee"
         xmlns:xsi="http://www.w3.org/2001/XMLSchema-instance"
         xsi:schemaLocation="http://xmlns.jcp.org/xml/ns/javaee
         http://xmlns.jcp.org/xml/ns/javaee/web-app_3_1.xsd"
         version="3.1">

    <servlet>
        <servlet-name>customers</servlet-name>
        <servlet-class>com.digizol.webapp.plotly.CustomerServlet</servlet-class>
    </servlet>

    <servlet-mapping>
        <servlet-name>customers</servlet-name>
        <url-pattern>/customers</url-pattern>
    </servlet-mapping>

</web-app>
index.jsp
This has the ability to submit the results size to "/customers" URL which actually is received by CustomerServlet.
<html>
<body>
    <div>
        <h1>Customer Information Center</h1>
        Draw customer information graph.<p/>
        <form action="customers" method="get">
            Results size:
            <select name="size">
              <option value="5">5</option>
              <option value="10">10</option>
            </select>
            <p/>
            <button style="padding:5px">Draw Chart</button>
        </form>
    </div>
</body>
</html>
pom.xml
Maven build file is used to generate the WAR file including the libraries.
<project xmlns="http://maven.apache.org/POM/4.0.0"
  xmlns:xsi="http://www.w3.org/2001/XMLSchema-instance"
  xsi:schemaLocation="http://maven.apache.org/POM/4.0.0
  http://maven.apache.org/maven-v4_0_0.xsd">

  <modelVersion>4.0.0</modelVersion>
  <groupId>com.digizol.webapp.plotly</groupId>
  <artifactId>webapp-with-plotly</artifactId>
  <packaging>war</packaging>
  <version>1.0-SNAPSHOT</version>
  <name>webapp-with-plotly maven webapp</name>

  <dependencies>
    <dependency>
      <groupId>javax.servlet</groupId>
      <artifactId>javax.servlet-api</artifactId>
      <version>3.1.0</version>
    </dependency>
    <dependency>
        <groupId>javax.servlet</groupId>
        <artifactId>jstl</artifactId>
        <version>1.2</version>
    </dependency>
  </dependencies>

  <build>
    <finalName>customers-plotly</finalName>
  </build>

</project>
2. Build & Deploy
With Maven 3.*, you can build the project using "mvn clean package" command. Deployable customers-plotly.war is generated inside target folder.Copy customers-plotly.war into webapps directory of a Tomcat deployment and start Tomcat server.
Use below URL to see the web page & try clicking "Draw Chart" button.
http://localhost:8080/customers-plotly

Adding charts to this webpage is covered in Part 2.
![[Eclipse] Access restriction: Class is not accessible due to restriction on required library](https://blogger.googleusercontent.com/img/b/R29vZ2xl/AVvXsEgGWqHB7pxaPjC9UKRJMWuiVgv9sd4oi2zDdwDD10FNa9u558aPgMzByPSi9_pK1ZM5HcjkMuzIaF1iXZQvCMq80jLivRajfEzcWk4J5uIu5H9hI3AbWORSXelibbY19iaoqpUzQQLFYAUm/s72-c/Eclipse+Access+restriction+rules.png)


The links to Part 2 don't work.
ReplyDeleteThanks for pointing it out. I corrected it now.
ReplyDelete